Containerize Microservice with Amazon ECS and Application Load Balancer
In this tutorial, we will create a python based microservice and will deploy on to Amazon ECS along with Application Load Balancer with dynamic port mapping. Here we will create three images of microservice which will run behind an Application Load Balancer on ECS.
To achieve this we will perform following steps:
Step1: Create microservice app [3 separate apps to see the ALB effect]
Step 2: Create Dockerfile(s)
Step3: Create ECR Repository and push images to ECR
Step4: Create ECS cluster
Step5: Create Task Definition & add container information
Step6: Create Service to run the Task definition
Step7: Create Application Load Balancer
Step8: Fix security group settings
Step9: Complete creation of service by providing ALB name
Step10: Verify the running services
Step11: Delete resources (ECS Cluster, Load Balancer)
Step1: Create microservice app
Here we are creating a sample python based simple ‘Hello World’ microservice app. Lets write its code in index.py using flask which is a small HTTP server for python apps
index.py
from flask import Flask
app = Flask(__name__)
@app.route("/service-1")
def hello():
    return "Hello World from service-1!"
if __name__ == "__main__":
    app.run(host="0.0.0.0", port=int("5001"), debug=True)
Step 2: Create Dockerfile
Dockerfile
FROM python:alpine3.7
COPY . /app
WORKDIR /app
RUN pip install -r requirements.txt
EXPOSE 5001
ENTRYPOINT ["python","./index.py"]
Where FROM directive is to tell Docker that which base image is to take from Docker Hub.
COPY directive moves the application into the container image
WORKDIR sets the working directory
RUN directive is calling PyPi(pip) to install dependencies available in file: “requirements.txt”
EXPOSE directive is to expose a port to be used by flask
ENTRYPOINT command is to execute the actual application scrtpt
requirements.txt
flaskCheck if Docker is available on machine
docker --versionSteps to install Docker on Linux ec2 (if not already available)
install docker on ec2:sudo yum update -y
sudo yum install -y docker
sudo service docker startsudo usermod -a -G docker ec2-user
exit==> login again
docker info
docker --version
So by now we have created index.py, requirements.txt, Dockerfile for our first microservice service-1 which is set to run at 5001 port. Similarly create service-2 and service-3 on ports 5002 and 5003 respectively.
Now lets create the Elastic Container repository (ECR) repository and create and push images to that repository.
Step3: Create ECR Repository
Go to the AWS management console and open ECR dashboard,provide the repository name as ‘microservices-repo’ and leave everything default and click on create repository.
Now select the repository and click on ‘View Push Commands’ option
Which will give you the commands to Login (via CLI), Create image, Create tag and push tag to ECR repository
Ensure you have awscli version2 configured (follow the steps here: https://medium.com/@learning.dipali/install-awscli-v2-b54931091bbb )
To check cli version you can run:
aws --version
Else, run ‘aws configure’ and use access key and secret key to configure the same.
I have used following commands to create and push the three images to ECR repo.
aws ecr get-login-password --region us-east-1 | docker login --username AWS --password-stdin 16xxxxxx.dkr.ecr.us-east-1.amazonaws.com
 docker build -t microservices-repo:service-1 .
 docker tag microservices-repo:service-1 16xxxxxx.dkr.ecr.us-east-1.amazonaws.com/microservices-repo:service-1
 docker push 16xxxxxx.dkr.ecr.us-east-1.amazonaws.com/microservices-repo:service-1

 aws ecr get-login-password --region us-east-1 | docker login --username AWS --password-stdin 16xxxxxx.dkr.ecr.us-east-1.amazonaws.com
 docker build -t microservices-repo:service-2 .
 docker tag microservices-repo:service-2 16xxxxxx.dkr.ecr.us-east-1.amazonaws.com/microservices-repo:service-2
 docker push 16xxxxxx.dkr.ecr.us-east-1.amazonaws.com/microservices-repo:service-2

 aws ecr get-login-password --region us-east-1 | docker login --username AWS --password-stdin 16xxxxxx.dkr.ecr.us-east-1.amazonaws.com
 docker build -t microservices-repo:service-3 .
 docker tag microservices-repo:service-3 16xxxxxx.dkr.ecr.us-east-1.amazonaws.com/microservices-repo:service-3
 docker push 16xxxxxx.dkr.ecr.us-east-1.amazonaws.com/microservices-repo:service-3
Snapshot of the repository is below:

Once we have clearly tagged images in to the repository, Next step is to create ECS cluster
Step4: Create ECS cluster
Go to the Amazon ECS dashboard => Cluster =>Create Cluster and consider following configurations while cluster creation:
Select Cluster template as “EC2 Linux + Networking”
Provide cluster name as ‘microservices-cluster’
choose EC2 instance type as ‘t3.small’
Number of instances ‘2’
and leave rest everything as default.
it will create a Cluster with 2 EC2 instances in a new VPC and a new security group with name starting from ‘EC2ContainerService….’

Step5: Create Task Definition & add container information
From the ECS dashboard go to Task Definition => Create New Task Definition with launch type as EC2
Name: service-1-td, and click on Add Container (refer snapshot below)

Now use following configurations to add container:
Container Name: service-1-cont
image: image URI of service-1 tag from ECR
Memory Limit: Soft Limit — 512
Port mapping: 80 => 5001
then click on Add
Snapshot below for reference:

Then click on create for Task definition to get created.
Similarly create 2 more Task definitions for service-2 and service-3
The only difference will be in the container port mapping. here to allow dynamic post mapping via ALB, we will map port 0 to 5002 and 0 to 5003. Please refer snapshot below:

Once, we have Task Definition ready, its time to create Service (which will be run using task definition template created in this step.
Step6: Create Service to run the Task definition
Open the cluster and click on ‘Create’ under Services tab
Consider following service configurations:
Launch type: EC2
Task Definition: service-1-td
service name: service-1
No. of tasks: 1

Choose Task Placement as ‘BinPack’ and Click on ‘Next Step’. Under Load balancing we need to use Application Load Balancer. For which we need to create and ALB first.
Step7: Create Application Load Balancer
In New tab, Open EC2 console and go to the ‘Load balancer’ While ALB creation, it is very important to create this ALB in the same VPC as of ECS cluster, use following configurations for ALB:
Name: microservicesLB
Listeners: HTTP : 80
VPC: (choose VPC as of ECS cluster) and select AZs
Then click on “Configure Security Settings” and then “Next: Configure Security Groups”

Create new Security Group named: MicroservicesLB-SG

Now, Click on “Next: Configure Routing”
Create New Target Group with Name: MicroservicesLB-TG

Then, Click on “Next: Register Targets”
Here, we do not need to register any targets (as these will be registered via ECS), Simply click on “Next: Review” and then “Create”
Once Load balancer is created, Note down (copy) the Security group id of this load balancer

Step8: Fix security group settings
Click on this Security group id, it will take you to the Security Groups page under EC2
Open the EC2 container service security group, and edit inbound rules to allow traffic from Load balancer security group with All TCP protocol and save rule.

Step9: Complete creation of service by providing ALB name
Now, Come back to the service creation tab. under Load Balancing section choose Application Load balancer and select the load balancer name just created. Also ensure Container name:Port mapping already populated with correct port
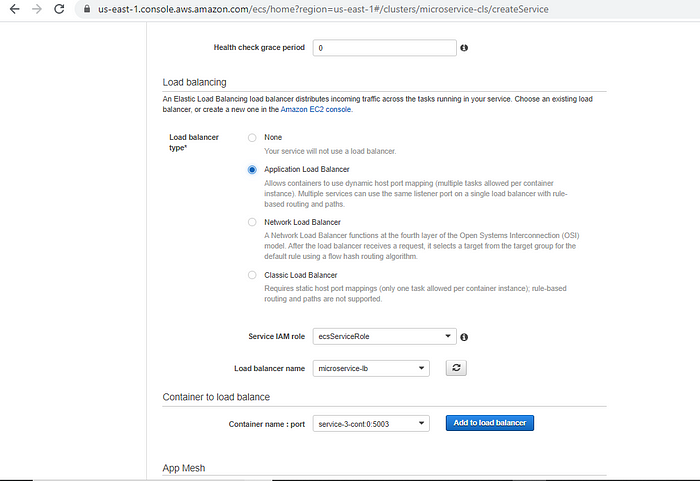
Now, Click on “Add to Load balancer”
Choose following configuration in ‘Container to Load balance’ section
Production Listener Port: 80:HTTP
Leave the default Target group name
Make sure Path pattern exactly matches with the end-point in your application script (index.py) followed by /*
Provide Evaluation order as 1 or 2 or 3 for service-1, service-2, service-3 respectively
Health check path should also be the same as end-point

Click on Next step =>Next Step and Create Service
Step10: Verify the running services
Once the service is created, pick the DNS of ALB followed by /service-1 (service-2 or service-3)
it should display the running application with message: Hello World from Service-1!
e.g. refer snapshot below:

Step11: Delete resources (ECS Cluster, Load Balancer)
Go to ECS Dashboard => open cluster => Delete Cluster
Go To Load Balancer via EC2 => Select Load Blancer =>Actions =>Delete
PS: Comment if it improvements and Applaud if useful.